Polymerase Chain Reaction (PCR) is one of the most widely used techniques in molecular biology, revolutionizing the way scientists study DNA. From clinical diagnostics to genetic research and forensic science, PCR has become an indispensable tool for amplifying specific DNA sequences with unparalleled precision and efficiency. In this article, we will explore the fundamental principles of PCR, the essential equipment and reagents required, step-by-step procedures, and common challenges encountered during experiments, along with practical solutions to overcome them.
Experimental Principle
Polymerase Chain Reaction (PCR) is a molecular biology technique used to amplify specific DNA sequences. The method relies on the natural mechanism of DNA replication, allowing the exponential amplification of target DNA through repeated cycles of denaturation, annealing, and extension. Each cycle doubles the number of DNA copies, leading to the rapid accumulation of billions of copies from a single or a few initial molecules.
Denaturation of template DNA: After the template DNA is heated to about 93℃ for a certain period of time, the double-stranded DNA of the template DNA or the double-stranded DNA formed by PCR amplification is dissociated to become a single strand, so that it can bind to the primer and prepare for the next round of reaction;
Annealing (renaturation) of template DNA and primer: After the template DNA is heated and denatured into a single strand, the temperature drops to about 55℃, and the primer and the complementary sequence of the template DNA single strand are paired and bound;
Primer extension: Under the action of TaqDNA polymerase, the DNA template-primer conjugate uses dNTP as the reaction raw material and the target sequence as the template to synthesize a new semi-conservative replication chain complementary to the template DNA chain according to the principle of base pairing and semi-conservative replication.
Each cycle of PCR approximately doubles the amount of the target DNA, leading to exponential amplification during the early stages. The total number of amplified copies ( Y ) can be expressed as Y = ( 1 + X )ⁿ , where X is the average amplification efficiency per cycle, and n is the number of cycles. While theoretical efficiency is 100% ( X = 1 ), practical conditions often lead to lower efficiencies due to factors such as enzyme activity, reagent depletion, or competition from non-specific products.
As the reaction progresses, the accumulation of PCR products eventually transitions from an exponential phase to a linear phase, and finally to a plateau phase, where amplification slows or stops. This phenomenon, known as the “plateau effect,” occurs due to limitations such as reagent depletion, reduced enzyme activity, or competition from non-specific amplification.
PCR produces two main types of DNA products: long fragments and short fragments. Long fragments are generated in the initial cycles when the primers bind to the original template and extend without defined endpoints. Starting in the second cycle, short fragments—defined precisely by the primer binding sites—begin to form as primers anneal to newly synthesized long fragments. The short fragments increase exponentially, while the long fragments grow arithmetically and become negligible over time. This specificity ensures that the final amplified products consist almost entirely of the target DNA sequence, making them suitable for downstream applications without further purification.
Equipment and Reagents
To perform a standard PCR experiment, the following equipment and reagents are required:
Equipment:
1. Thermal cycler (PCR machine)
2. Micropipettes (with appropriate volume ranges)
3. Sterile pipette tips (with filter)
4. Microcentrifuge
5. Vortex mixer
6. Ice box or cooling rack
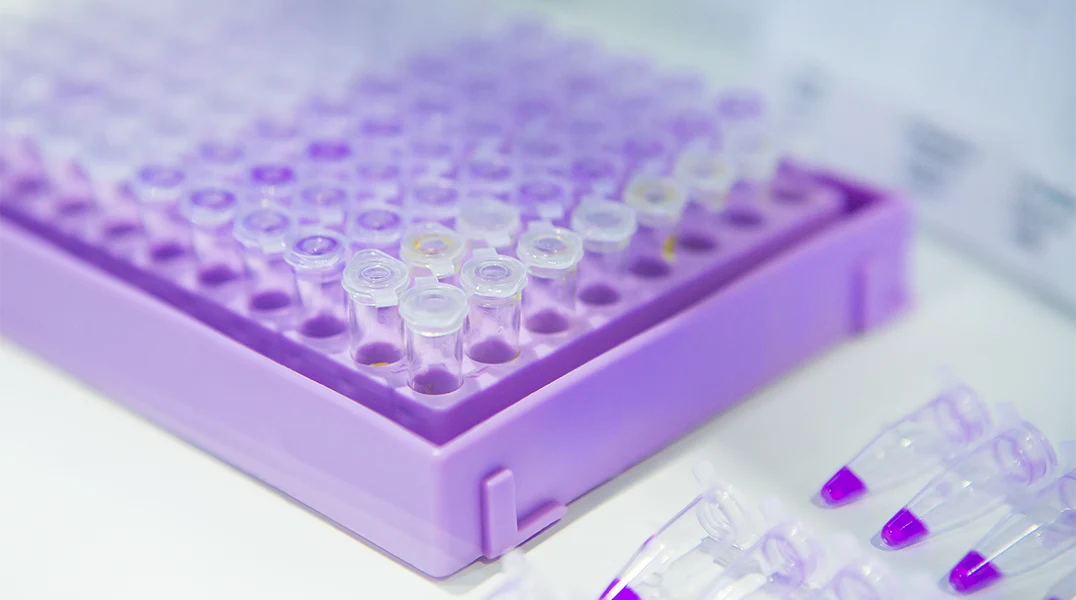
7. PCR tubes or 96-well PCR plate
8. UV transilluminator or gel documentation system (for result analysis)
Reagents:
1. Template DNA
2. Forward primer
3. Reverse primer
4. DNA polymerase (e.g., Taq polymerase)
5. dNTP mix (deoxynucleotide triphosphates)
6. PCR buffer (with MgCl₂ or separately provided MgCl₂)
7. Nuclease-free water
8. Loading dye (for gel electrophoresis, if applicable)
9. DNA ladder (for gel electrophoresis, if applicable)
This list ensures that all necessary components for setting up and analyzing a PCR reaction are available.
Preparation and Precautions
Proper preparation before starting a PCR experiment is essential for obtaining accurate and reliable results. Below is a detailed guide covering the key aspects of preparation and important considerations.
Preparation Steps
1. Design Specific Primers
Primer specificity affects the likelihood of a successful PCR reaction, and good primer design is crucial to successful PCR amplification. Therefore, please carefully consider the following principles when designing primers:
Length: Primers should be 18–22 nucleotides long to ensure sufficient specificity and compatibility with annealing temperatures.
Melting Temperature (Tm): Aim for a Tm between 52°C and 58°C, calculated based on the primer’s nucleotide composition. Both primers in the pair should have similar Tm values to ensure uniform annealing.
GC Content: A GC content of 40–60% is optimal for stability and specificity. Avoid excessive GC-rich or AT-rich sequences.
At present, many software can be used to design primers, such as primer5 and Oligo. Usually, the primers designed by these software can meet the needs.
2. Select an Appropriate DNA Polymerase
There are many DNA polymerases available on the market, and their characteristics vary. Therefore, you need to choose the product that best suits your experimental needs. Usually we divide DNA polymerase into high-fidelity polymerase and ordinary Taq polymerase.
High-fidelity polymerases are ideal for applications requiring error-free amplification, such as cloning or sequencing.
Standard Taq polymerase is sufficient for detecting the presence of specific sequences.
But you still need to be aware of specific polymerase properties. for example, high-fidelity polymerases do not add an A-overhang to the product, which is essential for TA cloning. If required, an A-tailing reaction must be performed post-PCR.
3. Prepare the DNA Template
You need to prepare a DNA template (e.g., genomic DNA or cDNA prepared by reverse transcription)
Use high-quality genomic DNA or complementary DNA (cDNA) synthesized through reverse transcription.
Avoid DNA degradation by minimizing freeze-thaw cycles and storing it at appropriate conditions, typically -20°C or -80°C.
4. Assemble Reaction Components
You also need to prepare a master mix containing all reaction components except the template DNA. This includes DNA polymerase, primers, dNTPs, buffer (with MgCl₂), and nuclease-free water. The master mix reduces pipetting errors and ensures consistency between reactions.
5. Prepare the Workspace
Setting up a dedicated clean area for PCR reaction assembly to minimize contamination risks is necessary. Use separate workstations for pre-PCR and post-PCR processes.
You will also need to wear gloves and change them frequently to avoid introducing contaminants. Besides, please use filter pipette tips for all liquid handling.
Precautions
1. Prevent Contamination
Negative controls (no template) should be set up during the experiment to detect contamination.
Avoid opening tubes containing amplified products in the same area where reaction setup occurs.
2. Optimize Reaction Conditions
Perform a gradient PCR to determine the optimal annealing temperature for your primers.
Adjust MgCl₂ concentration as needed to enhance polymerase activity without compromising specificity.
3. Ensure Sample Integrity
Store all reagents, including primers and dNTPs, at recommended temperatures. Thaw them on ice before use and mix gently to avoid degradation.
By following these detailed preparation steps and precautions, you can maximize the efficiency, specificity, and accuracy of your PCR experiment, ensuring robust and reproducible results.
Experimental Procedure
1. Reaction System Preparation
To prepare the PCR reaction system, sequentially add the following reagents into a 0.5 mL microcentrifuge tube. Follow the table for guidance:
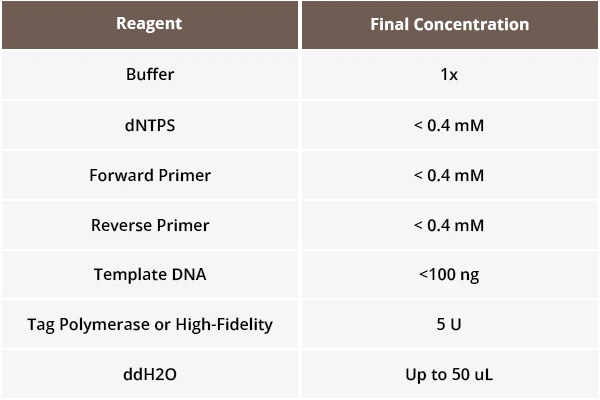
When using Taq polymerase, ensure the final product will contain A-overhangs suitable for T-vector ligation.
For High-Fidelity Polymerase, note that the final products are blunt-ended, requiring an additional A-tailing step before T-vector ligation, or choose another suitable vector.
Ensure all reagents are mixed gently but thoroughly before proceeding.
2. PCR Cycling Protocol
Program the thermal cycler with the following steps.
Initial Denaturation: Heat the reaction mixture to 94–98°C for 2–5 minutes. This step ensures complete denaturation of the DNA and activation of the polymerase, particularly for Taq polymerase.
Denaturation: Heat to 94–98°C for 20–30 seconds to separate the DNA double strands into single strands.
Annealing: Lower the temperature to 50–65°C, depending on the primers’ Tm values (generally 3–5°C lower than Tm).
Maintain this step for 20–40 seconds to allow primers to bind to the complementary DNA sequences.
Extension: Set the temperature to 72°C for Taq polymerase or the optimal temperature for high-fidelity polymerase. During this step, the polymerase synthesizes new DNA strands by adding dNTPs to the primer’s 3′ end. The duration depends on the target DNA length, with ~1 minute per kb being a common guideline.
Cycle Repetition: Repeat steps 2–4 for 30–35 cycles. Each cycle approximately doubles the DNA amount during the exponential amplification phase.
Final Extension: After completing the cycles, incubate at 68–72°C for 5–10 minutes to ensure all remaining single-stranded DNA is fully extended.
Hold: Maintain the reaction at 4–10°C to preserve the PCR products until further use.
3. Agarose Gel Electrophoresis
Prepare the Gel: Dissolve the appropriate amount of agarose in TAE or TBE buffer. Heat the solution until clear, cool to ~50°C, and pour into the gel tray with a comb. Allow it to solidify.
Choose the agarose concentration based on the target DNA size:
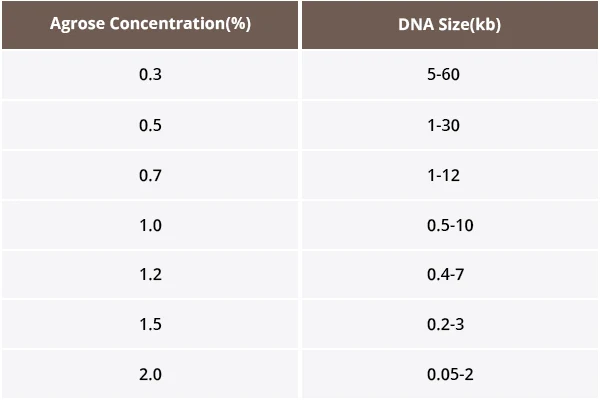
Load the Samples: Mix 5 µL of PCR product with 1 µL of loading dye and carefully load it into the gel wells. Avoid cross-contaminating the wells.
Run the Gel: Set the voltage to 4–10 V/cm (gel length) and run the gel for 30–40 minutes. Include a DNA marker for size reference.
Visualize the DNA: Stain the gel with a DNA dye (e.g., ethidium bromide or a safe alternative), then visualize under UV light. Compare the bands to the marker to confirm the sizes of the PCR products.
Results Analysis and Interpretation
After completing the PCR reaction and agarose gel electrophoresis, you can analyze the results using the following steps:
1. Examine the Gel
Visualize the gel under UV light or a blue-light transilluminator. Locate the DNA bands corresponding to the PCR products and compare their positions to the DNA marker (ladder).
Expected Band: Identify the band at the expected size based on the target DNA fragment’s length.
A single, distinct band at the correct size indicates a successful PCR reaction.
If multiple bands appear, it suggests non-specific amplification or primer-dimer formation. Then you need to adjust primer design or optimize the annealing temperature in subsequent experiments.
2. Interpret the Results
A single, sharp band at the expected position confirms the successful amplification of the target sequence with high specificity.
Non-Specific Amplification: Faint or unexpected bands may indicate non-specific primer binding. Lowering the primer concentration or increasing the annealing temperature can improve specificity.
Primer-Dimers: If a small band (~50-100 bp) appears near the bottom of the gel, it is likely due to primer-dimers. Reducing primer concentration or ensuring primers are designed to avoid self-complementarity can minimize this issue.
No Bands: The absence of any visible bands may result from insufficient template DNA, degraded primers, incorrect reaction conditions, or a malfunctioning polymerase. Recheck the reaction components and protocol.
3. Quantitative Analysis (Optional)
For semi-quantitative analysis, compare the intensity of the target band to that of a DNA marker or a standard control. Use gel imaging software for more accurate measurements.
Ensure equal loading across wells to avoid misleading conclusions based on uneven band intensity.
4. Troubleshooting
If the results do not match expectations:
① Verify the template DNA quality and concentration using a spectrophotometer or a fluorometer.
② Reassess primer design for errors such as mismatches, low specificity, or incorrect Tm.
③ Optimize reaction conditions, including buffer composition, magnesium ion concentration, and thermal cycler settings.
Common PCR Problems and Optimization Strategies
PCR issues often arise due to the complex interplay of reaction components and conditions. Below is an in-depth exploration of common problems, their underlying causes, and targeted strategies for optimization.
1. No Amplification Product
① Causes:
Degraded or missing reagents: dNTPs, primers, or polymerase may have deteriorated over time.
Incorrect reaction setup: Errors in reagent concentration, missing components, or inaccurate pipetting.
Suboptimal annealing temperature: Annealing temperature too high prevents primer binding.
Poor template quality: Contaminants like proteins, salts, or inhibitors interfere with the reaction.
② Optimization Strategies:
Ensure the integrity of reagents by storing them appropriately and testing their activity before use.
Double-check reaction setup, following the exact volumes and concentrations specified in the protocol.
Perform a temperature gradient PCR to identify the optimal annealing temperature for primer binding.
Purify template DNA using commercial kits to remove contaminants and improve amplification efficiency.
2. Non-Specific Amplification or Multiple BandsYour Content Goes Here
① Causes:
Poor primer design: Primers bind to off-target regions of the template DNA.
Inadequate annealing temperature: Low annealing temperatures allow primers to bind non-specifically.
Excessive reagent concentrations: High concentrations of primers, magnesium ions, or template DNA promote non-specific interactions.
② Optimization Strategies:
Redesign primers to improve specificity. Avoid repetitive sequences and ensure primers are at least 18–22 bp in length.
Use primer design tools to predict Tm values and select annealing temperatures accordingly (Tm – 3°C to 5°C).
Lower the primer and magnesium ion concentrations to the recommended range (e.g., 0.2–0.4 µM primers, 1.5–2.5 mM Mg²⁺).
Use a hot-start polymerase to reduce non-specific amplification during initial thermal cycling.
3. Primer-Dimer Formation
① Causes:
Complementarity within or between primers: Primers form secondary structures or hybridize with each other.
Excessive primer concentration: Overabundance of primers exacerbates self-annealing.
② Optimization Strategies:
Evaluate primer sequences for complementarity using tools like OligoAnalyzer, and redesign if necessary.
Reduce primer concentrations to the lower end of the recommended range (e.g., 0.2 µM).
Use a hot-start DNA polymerase to prevent primer-dimer formation during the initial reaction setup.
4. Weak or Faint Bands on Gel
① Causes:
Insufficient template DNA: Low template concentration leads to reduced product yield.
Imbalance in reagents: Suboptimal primer, dNTP, or magnesium ion concentrations.
Short elongation time: Insufficient time for DNA polymerase to extend the primers.
② Optimization Strategies:
Increase the template DNA concentration within the recommended range (10–100 ng for genomic DNA).
Verify and adjust the concentrations of primers (0.2–0.4 µM) and dNTPs (0.2 mM).
Extend the elongation step to allow sufficient time for the synthesis of longer DNA fragments (e.g., 60 seconds per kb).
5. Smearing on Agarose Gel
① Causes:
Overloading the gel: Excessive DNA in the well causes smearing.
Template contamination: Impurities degrade amplification products.
Cycling errors: Overly high denaturation temperatures or prolonged cycling degrade the amplified DNA.
② Optimization Strategies:
Load smaller volumes of the PCR product (e.g., 5–10 µL per well).
Purify template DNA to remove contaminants like salts, proteins, or phenol.
Optimize cycling conditions: use 94°C for denaturation and avoid cycling beyond 35 rounds.
6. Unexpected Band Sizes
① Causes:
Non-specific primer binding: Primers amplify unintended regions of the template.
Contaminated template DNA: Non-target sequences in the template contribute to spurious amplification.
② Optimization Strategies:
Use BLAST to verify primer specificity against the template genome.
Purify template DNA to eliminate potential contaminants.
Incorporate additional steps like touchdown PCR to enhance specificity.
7. Amplification Bias with GC-Rich or AT-Rich Templates
① Causes:
Secondary structures in GC-rich regions: Strong hydrogen bonding in GC pairs hinders polymerase progression.
Weak primer binding to AT-rich regions: Low hydrogen bonding reduces stability.
② Optimization Strategies:
Use additives like DMSO, betaine, or formamide to relax secondary structures in GC-rich regions.
Extend annealing time for AT-rich templates to allow primers sufficient time to bind.
Select a polymerase specifically designed for challenging templates, such as high-fidelity or GC-rich-tolerant enzymes.
Conclusion
PCR is a powerful technique that underpins countless advancements in molecular biology, diagnostics, and research. However, achieving consistent and accurate results requires careful attention to reaction setup, optimization strategies, and troubleshooting. By understanding the root causes of common PCR issues and implementing tailored solutions, researchers can significantly improve the reliability and efficiency of their experiments.
At GenFollower, we are committed to supporting your success in the lab. We offer a comprehensive range of high-quality laboratory consumables tailored for PCR experiments, including PCR tubes, microcentrifuge tubes, filter tips, petri dishes. Our products are manufactured with precision and undergo rigorous quality control to meet the demands of modern research. Explore our product range to enhance your PCR workflow and elevate your laboratory’s performance. If you have any related needs, please feel free to contact us.
Recent Posts
Step-by-Step ELISA Protocol: A Comprehensive Guide
What is ELISA? ELISA (Enzyme-Linked Immunosorbent Assay) is a widely used laboratory technique designed to detect and quantify specific soluble molecules — such as proteins, peptides, antibodies, hormones, and biomarkers (e.g., cytokines, chemokines, immunoglobulins) — [...]
Earth Day in the Lab: GenFollower’s Eco‑Driven Innovations for Sustainable Science
What is Earth Day? Earth Day began in the United States in the early 1970s, when a burgeoning environmental movement on college campuses sought to awaken public consciousness towards the fragility of our planet. [...]
What is Cell Therapy Manufacturing?Essentials and manufacturing processes for cell therapies
Cell therapy is rewriting the rules of modern medicine. Imagine a treatment that uses a patient’s own immune cells, reprogrammed in a lab to hunt down and destroy cancer—this is no longer science fiction [...]
