Beginner’s Guide: How to Use a Pipette Correctly
Whether you’re preparing reagents or conducting various experiments, pipettes are indispensable in the lab. However, many beginners often feel confused when using them, sometimes even inadvertently affecting their experimental results.
Don’t worry! This article will guide you step by step on how to master proper pipette techniques, helping you navigate your experiments with ease and avoid common “missteps.” Ready? Let’s dive into the world of pipettes together!
1. Working Principle of Pipettes
Pipettes are typically divided into two categories: air displacement pipettes and positive displacement pipettes. Despite their differences, both types operate on the principle of air pressure changes.
In standard pipettes, the uptake and dispensing of liquid are usually controlled by a piston. The piston’s movement creates a pressure differential between the interior and exterior of the pipette, which either draws liquid in or pushes it out.
However, the mechanisms of air displacement pipettes and positive displacement pipettes differ significantly, and understanding these differences is key to using them effectively.
1.1 Air Displacement Pipette
- Aspirating Liquid
When you press the button on the top of the pipette, the piston is pulled back, reducing the air pressure inside the pipette (creating negative pressure). Since the external air pressure is higher than the internal pressure, liquid is drawn into the pipette tip. The volume of liquid aspirated corresponds to the distance the piston moves.
- Dispensing Liquid
Upon releasing the button, the piston springs back, restoring the pressure and pushing the liquid into the target container. To ensure complete transfer of the liquid from the pipette tip, an additional press of the button is usually performed for a “second blowout.”
In an air displacement pipette, the liquid is separated from the internal piston and other components by a layer of air. The liquid only comes into contact with the disposable tip, preventing contamination.
1.2 Positive Displacement Pipette
- Aspirating Liquid
When the button is pressed, the piston directly pushes the liquid into the tip. At this stage, the liquid comes into direct contact with the piston. The volume of liquid aspirated is determined by the movement of the piston.
- Dispensing Liquid
Upon releasing the button, the piston continues to push the liquid out through the tip. Because the liquid is in direct contact with the piston, the positive displacement pipette can precisely transfer high-viscosity or otherwise challenging liquids.
The key feature of a positive displacement pipette is the direct contact between the liquid and the internal piston, with no air involved. This makes it exceptionally accurate and reliable for handling specialized liquids, such as viscous substances or liquids containing bubbles.
In summary, air displacement pipettes transfer liquid by utilizing air pressure differences, making them suitable for low-viscosity and standard liquids. In contrast, positive displacement pipettes move liquid directly through the piston, making them ideal for handling high-viscosity or specialized liquids. The difference in their working principles determines their distinct applications in practice.
2. Types of Pipettes
The most common types of pipettes are as follows, each suited to different experimental needs and volume ranges:
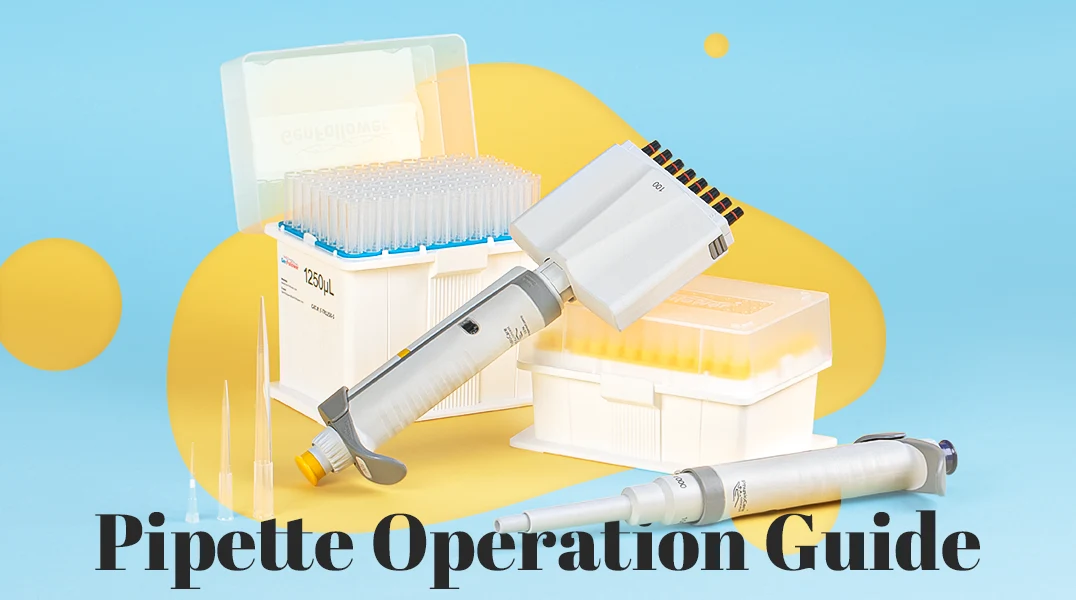
2.1 Manual Single-Channel Pipette
- Uses: The most common laboratory tool, used for precise aspiration and transfer of small liquid volumes.
- Features: Typically suitable for liquid volumes ranging from 1 μL to 1000 μL (1 mL).
- Common Brands: Eppendorf, Gilson, Thermo Fisher, etc.
- Types: Includes fixed-volume pipettes and adjustable-volume pipettes. Adjustable pipettes allow the user to set the desired liquid volume.
2.2 Multi-Channel Pipette
- Uses: Designed for transferring multiple liquid samples simultaneously, often used with 96-well plates or larger microplate formats.
- Features: Common configurations include 8-channel, 12-channel, and 16-channel options, ideal for multi-well plate operations. Particularly popular in high-throughput screening and analysis.
- Volume Range: Typically ranges from 1 μL to 300 μL.
- Advantages: Enhances workflow efficiency and is well-suited for experiments requiring high-throughput operations.
2.3 Automated Pipette
- Uses: Facilitates automated liquid handling, reducing manual errors and ideal for high-throughput experiments or tasks requiring precise, repetitive pipetting.
- Features: Controlled by robotic or automated systems, capable of performing liquid aspiration and dispensing automatically.
- Volume Range: Typically offers a wide range of volume settings to accommodate diverse experimental needs.
2.4 Micropipette
- Uses: Designed for transferring extremely small volumes of liquid, typically below 1 μL.
- Features: Offers high precision and repeatability, making it suitable for experiments in molecular biology, cell biology, and similar fields.
- Common Types: Often referred to as pipette guns, frequently used in PCR, DNA extraction, and other experiments requiring precise handling.
2.5 Bottle-Top Dispenser
- Uses: Designed for precise distribution of larger liquid volumes, commonly used for dispensing large quantities of solutions in the laboratory.
- Features: Suitable for handling larger volumes, typically over 10 mL, enabling quick and uniform liquid dispensing.
2.6 Electronic Pipette
- Uses: Provides electronically controlled pipetting for greater stability, precision, and convenience.
- Features: Powered by an electronic mechanism, sometimes equipped with multiple tips. Reduces operator fatigue and enhances accuracy, making it ideal for prolonged, high-frequency pipetting tasks.
2.7 Glass Pipette (Traditional Pipette)
- Uses: Used for transferring larger liquid volumes, typically in chemical analyses or large-scale laboratory operations.
- Features: Larger capacity, generally ranging from 1 mL to 50 mL, with high accuracy. Ideal for applications requiring precise volume measurements.
2.8 Plastic Pipette (Disposable Pipette)
- Uses: Typically for temporary or single-use applications, minimizing the risk of cross-contamination.
- Features: Capacity generally ranges from 1 mL to 25 mL. Affordable and easy to use.
These pipettes, tailored to various volume ranges, precision requirements, and experimental needs, are suited for different types of laboratory tasks.
3. Steps for Pipetting
3.1 Preparation
Ⅰ. Select the Appropriate Pipette
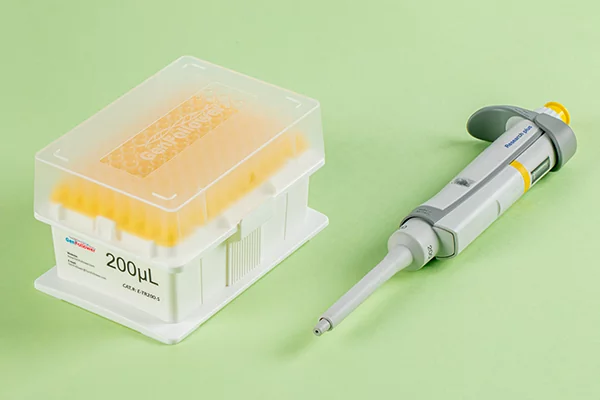
Choose a pipette with a suitable volume range based on the required liquid volume (e.g., 0.1–2 µL, 2–20 µL, 20–200 µL, 100–1000 µL, etc.).
Ⅱ. Choose the Correct Tip
Use a compatible tip that ensures a perfect fit with the pipette to prevent leakage and ensure accurate aspiration.
3.2 Attach the Pipette Tip
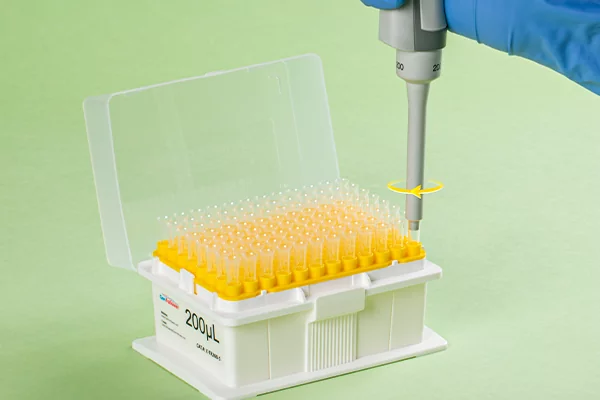
Gently insert the pipette vertically into the tip box and press it lightly. Rotate and push a few times to ensure the tip is securely attached to the pipette’s metal or plastic nozzle, preventing air leakage. (Do not strike the tip forcefully, as this may damage the tip or wear down the pipette barrel, compromising its seal.)
3.3 Set and Adjust the Volume
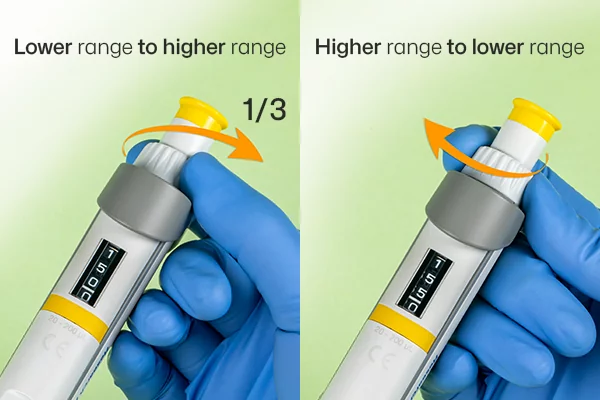
Set the desired volume by rotating the adjustment knob on the top of the pipette (some pipettes can lock the volume to prevent accidental changes). The volume display window will show the current set volume. It is generally recommended to operate within the 35–100% range of the pipette’s capacity.
When adjusting from a lower range to a higher range, rotate smoothly past the desired volume by about 1/3 of a turn, then rotate back to the required setting. When adjusting from a higher range to a lower one, rotate directly to the desired volume smoothly.
3.4 Aspirating Liquid
Ⅰ. Pre-wet the Tip (Optional)
To achieve higher accuracy, pre-wet the inner walls of the tip with the liquid to be aspirated (especially when working with viscous or volatile liquids). Repeat aspirating and dispensing 2 to 3 times with the same sample. This pre-washing helps provide a consistent contact surface for each aspiration, ensuring operational consistency.
(Note: For room temperature samples, pre-wetting the tip improves accuracy. However, for high-temperature or low-temperature samples, pre-wetting may reduce accuracy, so users should be cautious.)
Ⅱ. Press the Piston to the First Stop
Hold the pipette vertically above the surface of the liquid and slowly press the piston to the first stop position (do not press to the second stop before aspirating).
Ⅲ. Insert the Tip into the Liquid Surface
Insert the tip into the liquid surface (try to keep it vertical during aspiration, with an angle not exceeding 20°).
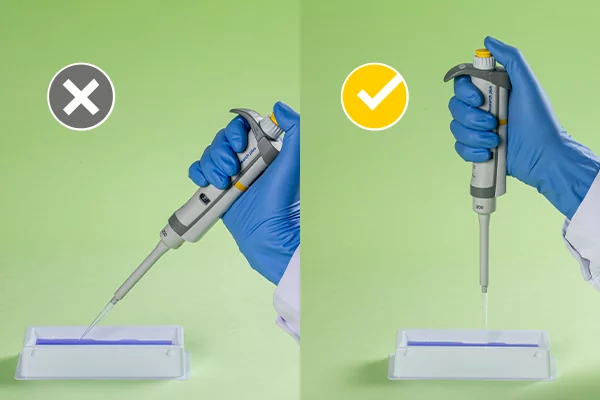
The depth to which the tip is immersed should be adjusted based on the liquid volume in the container to ensure accurate pipetting and prevent air aspiration. This step significantly impacts the accuracy, especially in experiments requiring high precision.
Here are recommended immersion depths based on different pipette ranges:
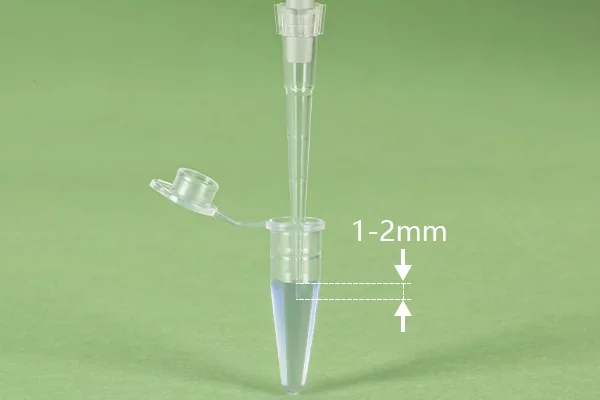
- Micropipette (0.1–10 µL)
Recommended immersion depth: 1–2 mm
Since the volume is very small, the tip should just lightly touch the surface of the liquid. Avoid deep immersion, as liquid may remain on the outer walls of the tip, affecting accuracy.
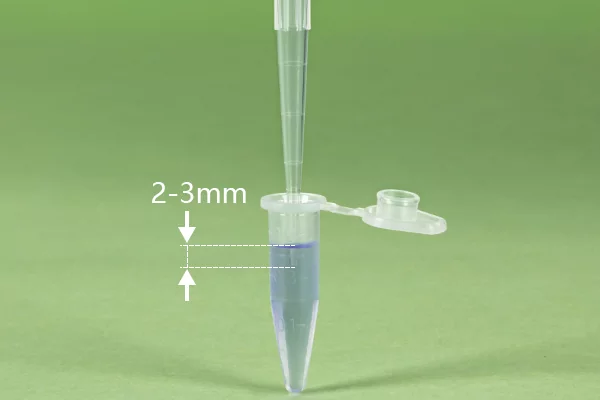
- Low-Range Pipette (10–100 µL)
Recommended immersion depth: 2–3 mm
This range is suitable for slightly deeper immersion, but the tip should still only be slightly submerged in the liquid to avoid excessive liquid retention on the tip’s inner and outer surfaces, which could affect dispensing accuracy.
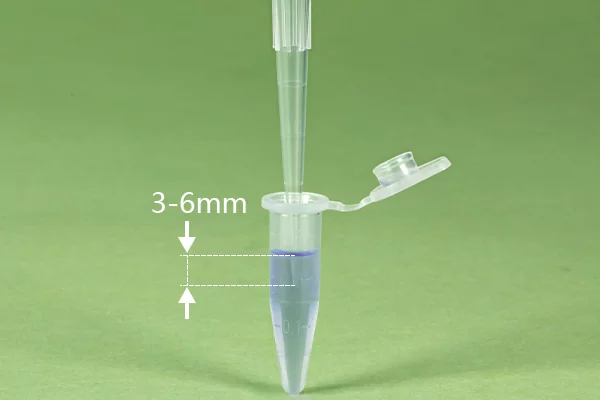
- Medium-Range Pipette (100–1000 µL)
Recommended immersion depth: 3–6 mm
For this range, the tip should be immersed slightly deeper into the liquid to ensure stable aspiration. This depth ensures enough liquid is aspirated while minimizing the risk of affecting accuracy due to excessive immersion.
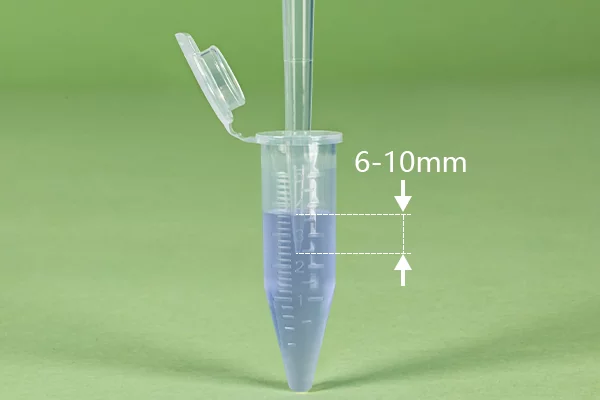
- Large-Range Pipette (1000 µL and above)
Recommended immersion depth: 6–10 mm
For large volumes, the tip needs to be submerged slightly deeper, especially when the liquid level is low in the container, to ensure stable aspiration. However, avoid over-immersion to reduce the chance of liquid adhering to the outer wall of the tip.
Ⅳ. Slowly Release the Piston
Hold the pipette vertically and slowly and evenly release your thumb, allowing the piston to rise and draw in the liquid. Do not release too quickly, as this may introduce air and result in inaccurate aspiration.
3.5 Dispensing
Position the pipette tip close to the inner wall or bottom of the target container to avoid splashing.
Ⅱ. Press to the first stop
Gently press the plunger down to the first stop to release most of the liquid.
Ⅲ. Press to the second stop
Push the plunger further to the second stop to expel any remaining liquid. This step is especially important for small-volume transfers to ensure the tip is completely emptied.
Ⅳ. Gently lift the tip
While keeping the plunger pressed down, carefully move the tip along the container wall to prevent residual liquid from clinging to the tip’s end.
3.6 Discard the Tip
Press the tip ejector button on the pipette to safely dispose of the tip into a waste container, avoiding contamination.
3.7 Cleaning and Maintenance
4. Precautions
4.1 Pay attention to room temperature and hand temperature
Before pipetting, ensure that the liquid and pipette are at equilibrium with room temperature. When the room temperature is low, the warmth of your hand may cause the air inside the pipette to expand, leading to errors when drawing in cold solutions. Avoid holding the pipette for extended periods; if not in use, place it on a stand or let it rest in your hand for a moment.
4.2 Prevent cross-contamination
Use a separate tip for each reagent, or clean and pre-wet the tips as necessary before use.
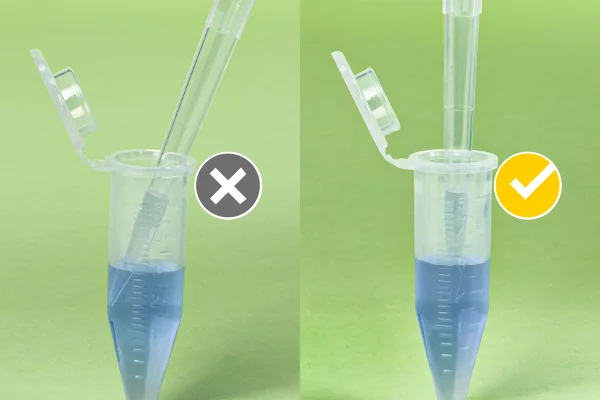
4.3 Avoid tip contact with walls
When aspirating liquid, ensure the tip does not touch the container walls, as capillary action may cause liquid loss.
4.4 Avoid air bubbles
Pipette slowly during both aspiration and dispensing to minimize air bubbles.
4.5 Choose the appropriate tip
Select a tip that matches the volume and type of liquid being handled.
4.6 Maintain consistent operation
Pause briefly for one second after aspirating the liquid before removing the tip from the liquid surface. Strive to maintain this pause consistently during operation. Use consistent plunger pressure and speed during both aspiration and dispensing to minimize volume fluctuations and improve the reproducibility and accuracy of your experiment.
4.7 Choosing the Right Pipette Tips
Using tips that are incompatible with the pipette can compromise airtightness and lead to inaccurate pipetting. Therefore, selecting the right tips is crucial. A high-quality, well-matched tip ensures reliable liquid transfer.
Firstly, opting for tips from the
same brand as your pipette is a safe choice. Pipette manufacturers design their tips to meet the unique specifications and technical requirements of their pipettes, ensuring compatibility, precision, and ease of use.
In addition to proprietary tips, many independent third-party manufacturers offer high-quality universal tips. These tips are often compatible with a wide range of pipette brands and perform reliably.
We sincerely recommend . As a leading supplier of pipette tips in China, GenFollower focuses on providing high-quality, cost-effective pipette tips. Their extensive product range includes universal pipette tips, LTS-compatible tips, wide bore tips, large volume tips, gel-loading tips, and robotic tips. These tips are perfectly compatible with numerous pipette brands, such as Eppendorf, Gilson, Thermo Fisher, and BRAND.
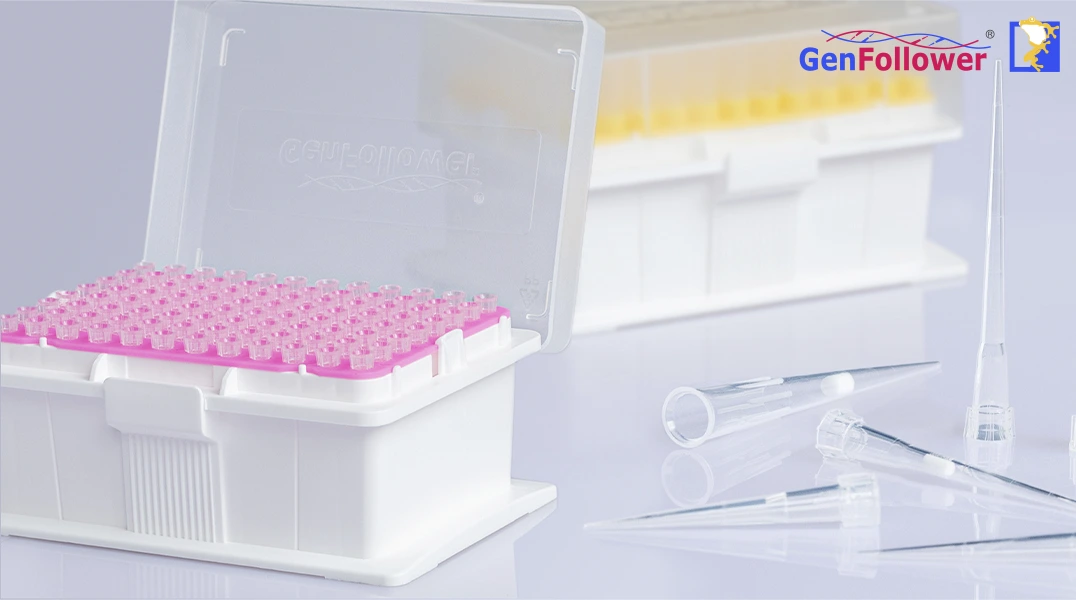
Whether for routine lab operations or experiments requiring high precision and reliability, GenFollower tips are up to the task. If you’re interested, feel free to click the link to learn more!
5. Conclusion
Although pipette operation is relatively straightforward, there are still key points worth noting. If this guide has been helpful to you, we are truly delighted! Proper operation and maintenance not only enhance the precision and efficiency of your experiments but also extend the lifespan of your pipette.
We hope this guide helps you master the essentials of pipette operation and achieve more reliable results in your experiments.
If you are in need of pipette tips, feel free to browse our website to find the products you need. For OEM or other customized requirements, don’t hesitate to contact us. We are committed to meeting your needs and providing you with the best purchasing experience!
The Ultimate Guide to Syringe Filters
Filtration plays a critical role in ensuring the purity and reliability of solutions across industries, from pharmaceuticals to environmental testing. Among the most widely used filtration tools are 0.22µm and 0.45µm filters, known for [...]
HPLC Troubleshooting Guide
High-Performance Liquid Chromatography (HPLC) is a cornerstone analytical technique widely used in chemistry, biochemistry, and pharmaceuticals for separating, identifying, and quantifying components in complex mixtures. Its precision and versatility make it indispensable for quality [...]
Standard Operating Procedure for Polymerase Chain Reaction(PCR)
Polymerase Chain Reaction (PCR) is one of the most widely used techniques in molecular biology, revolutionizing the way scientists study DNA. From clinical diagnostics to genetic research and forensic science, PCR has become an indispensable [...]
